HTML & CSS Deep Dive Part 1: Parsing and Rendering – How Browsers Make Sense of Your Code
Have you ever wondered that when you click on a random website how exactly does the HTML and CSS render out to something visual in front of our eyes? How does a UTF-8 coded text render as something visual?
Well you are in luck because this is a 2 part series of a deep dive into just HTML and CSS (none of that JavaScript black magic) and how could it possibly be Turing complete. Do keep in mind that while most of the details here are browser engine independent, some optimisations are Chromium (rather, Blink engine) centric.
Finally, this might be a long read so buckle up!
Construction of a DOM
The very first step begins when the server sends an HTML document to the browser. The renderer process receives a commit message for a navigation and begins to fetch HTML data, the main thread immediately starts parsing the text string (HTML) to build a Document Object Model (DOM). Although the browser can retrieve these bytes of data, it cannot do much until those bytes are converted into a format it recognizes. Hence, the first step is to turn the raw bytes into characters. Now the browser has the actual characters in the file, but characters alone are not sufficient. These characters are then further processed into tokens.
Without transforming those characters into tokens, the browser engine would just see a jumble of text that would not produce a meaningful website. So when you save a file with the .html extension, you instruct the browser engine to parse it as an HTML document. During parsing—specifically during tokenization—the parser accounts for every start and end HTML tag in your file.
The parser recognizes each string enclosed in angle brackets and applies the necessary set of rules. For instance, a token for an anchor tag has different properties from a token representing a paragraph tag. Conceptually, you can think of a token as a small data structure containing information about a specific HTML tag. In essence, the browser breaks the HTML file into these tokens to begin understanding your code. Below is a simplified grammar for the HTML parser, used here mainly for illustration:
(****************************************************************************
 * 1. TOKENS
 ****************************************************************************)

TAG_OPEN       = "<" ;
TAG_CLOSE      = ">" ;
END_TAG_SLASH  = "</" ;
SELF_CLOSE     = "/>" ;
EQUALS         = "=" ;
SLASH          = "/" ;
DOCTYPE_KEY    = "DOCTYPE" ;   (* uppercase here for simplicity *)
IDENT          = ? one or more letters/digits/punctuation except <,>,"?'= ? ;
WHITESPACE     = ? one or more of [ \t\n\f\r ] ? ;
STRING         =
    ( "\"" { ? any char except '"' ? } "\"" )
  | ( "'"  { ? any char except '\'' ? } "'"  ) ;

TEXT           = ? any run of characters that are not '<' ? ;


(****************************************************************************
 * 2. SYNTACTIC GRAMMAR
 ****************************************************************************)

Document =
    [ WHITESPACE ]
    [ Doctype ]
    [ WHITESPACE ]
    HtmlElement
    [ WHITESPACE ]
    ;

Doctype =
    "<!" [ WHITESPACE ] DOCTYPE_KEY [ WHITESPACE ] [ IDENT ] [ WHITESPACE IDENT ] ">"
    ;

HtmlElement =
    StartTag("html")
        [ HeadElement ]
        [ BodyElement ]
    EndTag("html")
    ;

HeadElement =
    StartTag("head")
        { HeadContent }
    EndTag("head")
    ;

HeadContent =
      TitleElement
    | MetaElement
    | LinkElement
    | ScriptElement
    | StyleElement
    | Comment
    | WHITESPACE
    ;

(*
  For simplicity I have defined minimal placeholders for meta, link, script, style tags.
*)

MetaElement =
    EmptyTag("meta")
    ;

LinkElement =
    EmptyTag("link")
    ;

StyleElement =
    StartTag("style")
        { TEXT }
    EndTag("style")
    ;

ScriptElement =
    StartTag("script")
        { TEXT }
    EndTag("script")
    ;

Comment =
    "<!--" { ? any character except "-->" ? } "-->"
    ;

TitleElement =
    StartTag("title")
        { TEXT }
    EndTag("title")
    ;

BodyElement =
    StartTag("body")
        { BodyContent }
    EndTag("body")
    ;

BodyContent =
      TextNode
    | CommonBlockElement
    | CommonInlineElement
    | Comment
    | WHITESPACE
    ;

TextNode =
    TEXT
    ;

CommonBlockElement =
      Paragraph
    | Heading
    | Div
    | Section
    | Nav
    | Article
    | Aside
    | Footer
    | Form
    | Table
    ;

Paragraph =
    StartTag("p")
        { InlineContent }
    EndTag("p")
    ;

Heading =
    StartTag( "h1" | "h2" | "h3" | "h4" | "h5" | "h6" )
        { InlineContent }
    EndTag( "h1" | "h2" | "h3" | "h4" | "h5" | "h6" )
    ;

Div =
    StartTag("div")
        { BodyContent }
    EndTag("div")
    ;

Section =
    StartTag("section")
        { BodyContent }
    EndTag("section")
    ;

Nav =
    StartTag("nav")
        { BodyContent }
    EndTag("nav")
    ;

Article =
    StartTag("article")
        { BodyContent }
    EndTag("article")
    ;

Aside =
    StartTag("aside")
        { BodyContent }
    EndTag("aside")
    ;

Footer =
    StartTag("footer")
        { BodyContent }
    EndTag("footer")
    ;

Form =
    StartTag("form")
        { BodyContent }
    EndTag("form")
    ;

Table =
    StartTag("table")
        { TableContent }
    EndTag("table")
    ;

TableContent =
      TableCaption
    | TableRow
    | TableSection
    | WHITESPACE
    | Comment
    ;

TableCaption =
    StartTag("caption")
        { InlineContent }
    EndTag("caption")
    ;

TableRow =
    StartTag("tr")
        { TableCell }
    EndTag("tr")
    ;

TableCell =
    StartTag("td")  { BodyContent } EndTag("td")
  | StartTag("th")  { BodyContent } EndTag("th")
    ;

TableSection =
    StartTag("thead") { TableRow } EndTag("thead")
  | StartTag("tbody") { TableRow } EndTag("tbody")
  | StartTag("tfoot") { TableRow } EndTag("tfoot")
    ;

(****************************************************************************
 * 2.1 Inline Elements
 ****************************************************************************)

CommonInlineElement =
      StartTag("span")  { InlineContent } EndTag("span")
    | StartTag("b")     { InlineContent } EndTag("b")
    | StartTag("i")     { InlineContent } EndTag("i")
    | StartTag("u")     { InlineContent } EndTag("u")
    | Anchor
    | ImageElement
    ;

Anchor =
    StartTag("a")
        { InlineContent }
    EndTag("a")
    ;

ImageElement =
    EmptyTag("img")
    ;

InlineContent =
      TextNode
    | WHITESPACE
    | CommonInlineElement
    ;

(****************************************************************************
 * 3. FACTORED-OUT PRODUCTIONS FOR TAGS & ATTRIBUTES
 ****************************************************************************)

StartTag(name) =
    TAG_OPEN [ WHITESPACE ] name Attributes? [ WHITESPACE ] TAG_CLOSE
    ;

EndTag(name) =
    END_TAG_SLASH name [ WHITESPACE ] TAG_CLOSE
    ;

EmptyTag(name) =
    TAG_OPEN [ WHITESPACE ] name Attributes? [ WHITESPACE ] SELF_CLOSE
    ;

Attributes =
    Attribute { WHITESPACE Attribute }
    ;

Attribute =
    AttributeName [ WHITESPACE? EQUALS WHITESPACE? AttributeValue ]
    ;

AttributeName =
    IDENT
    ;

AttributeValue =
      IDENT
    | STRING
    ;
This grammar illustration omits much of the safety checking that HTML performs (we will go into these checks in just a bit!).
Although tokens are a major step forward, they still do not represent the final structure. After tokenization, the tokens become nodes—individual objects with specific properties. One way to think of a node is as a discrete entity within the document object tree. Yet even nodes are not where the process ends.
Finally, once these nodes are created, they are connected in a tree data structure known as the DOM. In the DOM, parent-child relationships and sibling relationships (both adjacent and otherwise) are established, defining how every node in the tree relates to each other.
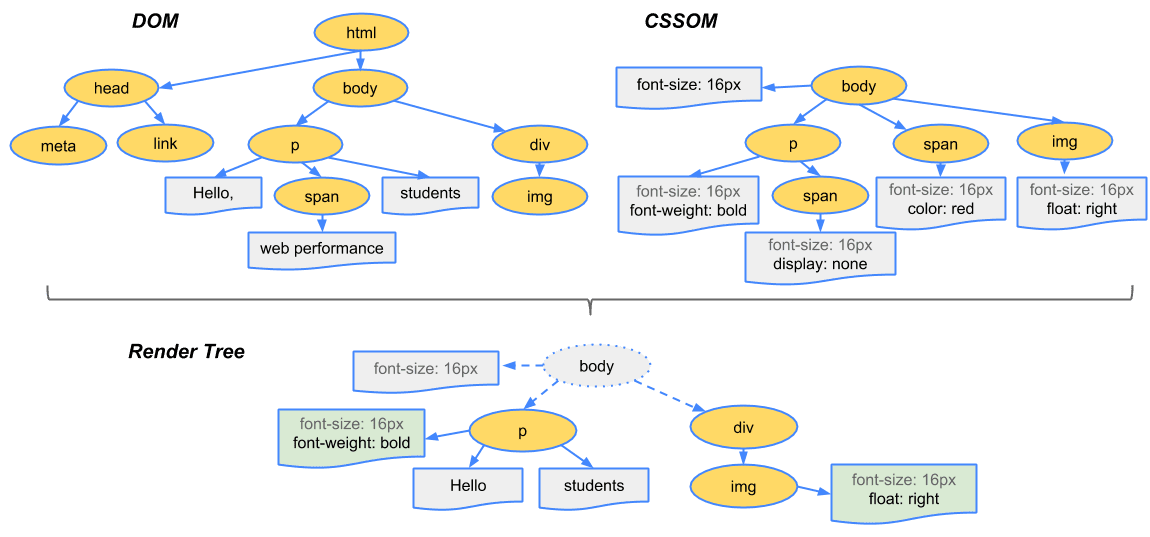
The DOM is both an internal representation of the webpage in the browser and an API that web developers can manipulate via JavaScript. Here is an example of what such a DOM might look like when fully constructed:
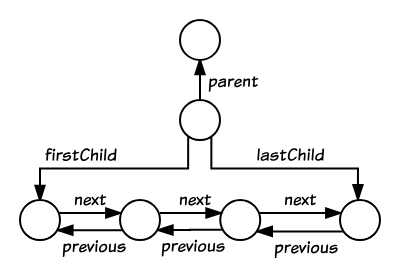
Node is the base class for all node types in this tree. Each Node has at least three pointers:
parent_or_shadow_host_node_: Points to the parent (or to the shadow host if it is a shadow root; explained later).
previous_: Points to the previous sibling.
next_: Points to the next sibling.
ContainerNode, from which Element inherits, adds child-specific pointers:
first_child_: Points to the first child node.
last_child_: Points to the last child node.
Because siblings are stored as a linked list, accessing the n-th child of a parent takes O(N) time, and the parent cannot instantly determine how many children it has (i.e., not in O(1) time). This tree is traversed using a highly efficient FlatTreeTraversal algorithm which traverses a composed tree in a flat tree order.
The HTML Standard defines how an HTML document is parsed into the DOM. You may notice that feeding HTML to a browser never truly “fails.” For example, an unclosed </p> tag is still considered valid HTML. Even malformed markup, like Hi! <b>I'm <i>Chrome</b>!</i> (where the <b> tag is closed before the <i> tag), is automatically corrected to Hi! <b>I'm <i>Chrome</i></b><i>!</i>. This flexibility exists because the HTML specification is designed to handle errors gracefully. If you want to explore these details, see “An introduction to error handling and strange cases in the parser” in the HTML spec. Techniques like the “adoption agency algorithm”, “foster parenting”, and the manipulation of the stack of open elements or the list of active formatting elements play a major role in making the parser robust and tolerant of markup errors.
Subresource Loading
The main thread could request them one by one as they find them while parsing to build a DOM, but in order to speed up, “preload scanner” is run concurrently. If there are things like <img> or <link> in the HTML document, preload scanner peeks at tokens generated by HTML parser and sends requests to the network thread in the browser process.
Styling
The main thread parses CSS to determine the computed style of each DOM node, figuring out which styles apply based on CSS selectors. Even if you do not write any custom CSS, every DOM node still has a computed style— for instance, <h1> is displayed larger than <h2>, and margins appear by default. This happens because the browser includes a default style sheet. Once parsed, the CSS is converted into the Cascading Style Sheets Object Model (CSSOM), an independent data structure. The browser transforms CSS rules into a set of styles it can interpret, traversing each rule set to build a tree of nodes linked by parent, child, and sibling relationships according to the CSS selectors.
Similar to HTML parsing, the browser must convert raw CSS into a form it can work with, effectively repeating the “text-to-object” process for CSS.
In Blink, CSS style calculation proceeds in three phases: indexing style rules, matching rules to each DOM element, and merging them to compute the final style. The rules are stored in RuleSets and indexed by selectors (e.g., class="cname" points to a ClassRules key). Style computation starts in ElementRuleCollector::CollectMatchingRulesForList, which uses SelectorChecker to iteratively match rules. Matched rules are combined in StyleForLayoutObject, taking into account user agent, user, and author styles. A recursive DOM pass (e.g., RecalcDescendantStyles) then applies these computed styles to the entire element tree, ensuring consistency. This process minimizes redundant checks while handling context-sensitive rules effectively.
The CSSOM tree also incorporates styles from the user agent’s style sheet. The browser starts with the most general rule applicable to a node and refines it by applying more specific rules in a cascading manner.
Building the CSSOM is typically extremely fast, to the point that its construction time is not separately shown in developer tools. Instead, when you see “Recalculate Style,” it indicates the combined time for parsing CSS, constructing the CSSOM tree, and recursively computing final styles. From a performance standpoint, optimizing CSSOM creation generally offers minimal returns, as it usually completes faster than a single DNS lookup.
Once both the DOM and CSSOM are available, they combine to form the render tree. This is why HTML and CSS are both considered render-blocking resources, as they need to be fully parsed before the page can be painted.
In Blink, style invalidation determines which DOM elements need their styles recalculated after modifications. This mechanism prevents unnecessary recalculations, using Invalidation Sets that define which nodes must be checked and how their descendants should be processed. DOM changes trigger invalidation in one of two ways: immediate invalidations (applied right away) or pending invalidations (batched before the next render). Nodes track their recalculation requirements via flags like NeedsStyleInvalidation or NeedsStyleRecalc. A RuleFeatureSet, derived from style rules, handles the specifics of invalidation logic. Pending invalidations are processed by StyleInvalidator::Invalidate, which traverses the DOM in a depth-first fashion to ensure every affected element is updated. This approach balances efficiency with correctness, accommodating changes that alter styles without recalculating unaffected nodes.
Layout
Layout determines the geometric properties of each element—its position and size—on a web page. To achieve this, the main thread traverses the DOM along with the computed styles to build a layout tree. This tree contains information such as each element’s x/y coordinates and its bounding box dimensions.
Not every element in the DOM appears in the layout tree: if an element has display: none, it is omitted from the layout tree (though visibility: hidden elements are still included). Conversely, pseudo-elements like p::before { content: "Hi!" } do appear in the layout tree, even though they do not exist in the DOM. Below is a simplified diagram illustrating how Blink handles layout:
    |-------------------------------------------------|
    |                                                 |
    |                  margin-top                     |
    |                                                 |
    |    |---------------------------------------|    |
    |    |                                       |    |
    |    |             border-top                |    |
    |    |                                       |    |
    |    |    |--------------------------|--|    |    |
    |    |    |                          |  |    |    |
    |    |    |       padding-top        |##|    |    |
    |    |    |                          |##|    |    |
    |    |    |    |----------------|    |##|    |    |
    |    |    |    |                |    |  |    |    |
    | ML | BL | PL |  content box   | PR |SW| BR | MR |
    |    |    |    |                |    |  |    |    |
    |    |    |    |----------------|    |  |    |    |
    |    |    |                          |  |    |    |
    |    |    |      padding-bottom      |  |    |    |
    |    |    |                          |  |    |    |
    |    |    |--------------------------|--|    |    |
    |    |    |     scrollbar height ####|SC|    |    |
    |    |    |-----------------------------|    |    |
    |    |                                       |    |
    |    |           border-bottom               |    |
    |    |                                       |    |
    |    |---------------------------------------|    |
    |                                                 |
    |                margin-bottom                    |
    |                                                 |
    |-------------------------------------------------|

    BL = border-left
    BR = border-right
    ML = margin-left
    MR = margin-right
    PL = padding-left
    PR = padding-right
    SC = scroll corner
    SW = scrollbar width
Note that in right-to-left writing modes, if a vertical scrollbar exists, it appears on the left side. A horizontal scrollbar, if present, always remains at the bottom.
Once the layout tree is built, the main thread produces paint records, which detail the specific drawing operations (e.g., “paint background, then draw text, then draw a rectangle”). In the rendering pipeline, each stage depends on the output of its predecessor. Consequently, if any part of the layout tree changes, the paint order must be recalculated for the affected sections.
Composition and Layout Rasterization
After layout is complete, the main thread scans the layout tree again to generate a layer tree (“Update Layer Tree” in Chrome DevTools). Layers are used to manage complex visuals; for instance, a slide-in menu can be placed on its own layer for performance. If the browser does not automatically create a layer, you can encourage it by using the will-change property in CSS.
Coordinate Systems Overview
Browser engines like Blink employ coordinate systems to position and paint elements, ensuring layouts adjust appropriately to different text directions, writing modes, and other layout factors. There are four primary coordinate spaces:
-
Physical Coordinates
- Definition: Aligned with the device’s actual output (screen or page).
- Usage: Directly used when painting elements and interpreting CSS properties such as
top,left,bottom, andright. - Example: An element with
top: 10px; left: 20px;is placed 10px from the top and 20px from the left of its containing block (in screen pixels).
-
Logical Coordinates
- Definition: An abstraction that adjusts to different writing modes (left-to-right or right-to-left) and block flows.
- Keywords:
start,endfor inline flow;before,afterfor block flow. - Purpose: Ensures a consistent layout regardless of language direction or writing mode.
-
Physical Coordinates with Flipped Block-Flow Direction
- Definition: A mirrored version of physical coordinates for certain writing modes like
vertical-rl. - Usage: Used to handle vertical layouts where block flow is reversed horizontally.
- Example: In
writing-mode: vertical-rl, the block start is on the right side rather than the left.
- Definition: A mirrored version of physical coordinates for certain writing modes like
-
Logical Coordinates Without Flipping Inline Direction
- Definition: A subset of logical coordinates that ignores text direction for inline positioning.
- Usage: Useful for scenarios where only block positioning needs to adapt (e.g., using
LogicalLeftorLogicalRight).
Writing Modes and Flipping
- Writing Modes: Define how text flows (e.g.,
horizontal-tb,vertical-rl). Each mode specifies the inline direction and block direction. - Flipping: In modes like
vertical-rl, the layout engine flips (mirrors) elements horizontally so their starting edge aligns with the right side.
Hierarchical Transformations
When the browser calculates the final position of each element:
- It starts by determining the element’s position relative to its container.
- It ascends through the layout tree, applying flips or other transformations at each container level as needed.
- Ultimately, coordinates are mapped to the physical screen (device space).
Rasterization and Composition Process
Once the layer tree and paint order are established, the main thread delivers that information to the compositor thread, which handles rasterization. This often involves:
- Tiling: Splitting large layers (e.g., a very tall webpage) into smaller rectangular “tiles.”
- Raster Threads: Worker threads that convert vector and layout data into rasterized images (bitmaps), storing them in GPU memory.
- Prioritization: Tiles within or near the viewport are rasterized first. For zooming, multiple tile resolutions may be maintained.
- Compositor Frames: After rasterization, a compositor frame is submitted to the browser process via IPC. The UI thread (for browser UI) or other renderer processes (for extensions) can also submit their own frames. All these frames eventually go to the GPU for rendering.
If a user scrolls, the compositor thread creates another compositor frame for the updated scroll position. While the CSS Compositing specification is part of web standards, Chrome uses its own Chrome Compositor to optimize performance by handling layers individually, then merging them.
This entire pipeline—taking raw data from HTML/CSS/JS and rendering it onto the screen—is known as the Critical Rendering Path (CRP). Techniques such as placing <script> tags at the bottom of the HTML or using the async attribute are examples of CRP optimization, where the goal is to reduce render-blocking operations and speed up page load times. This is what a CRP for a website might look like:
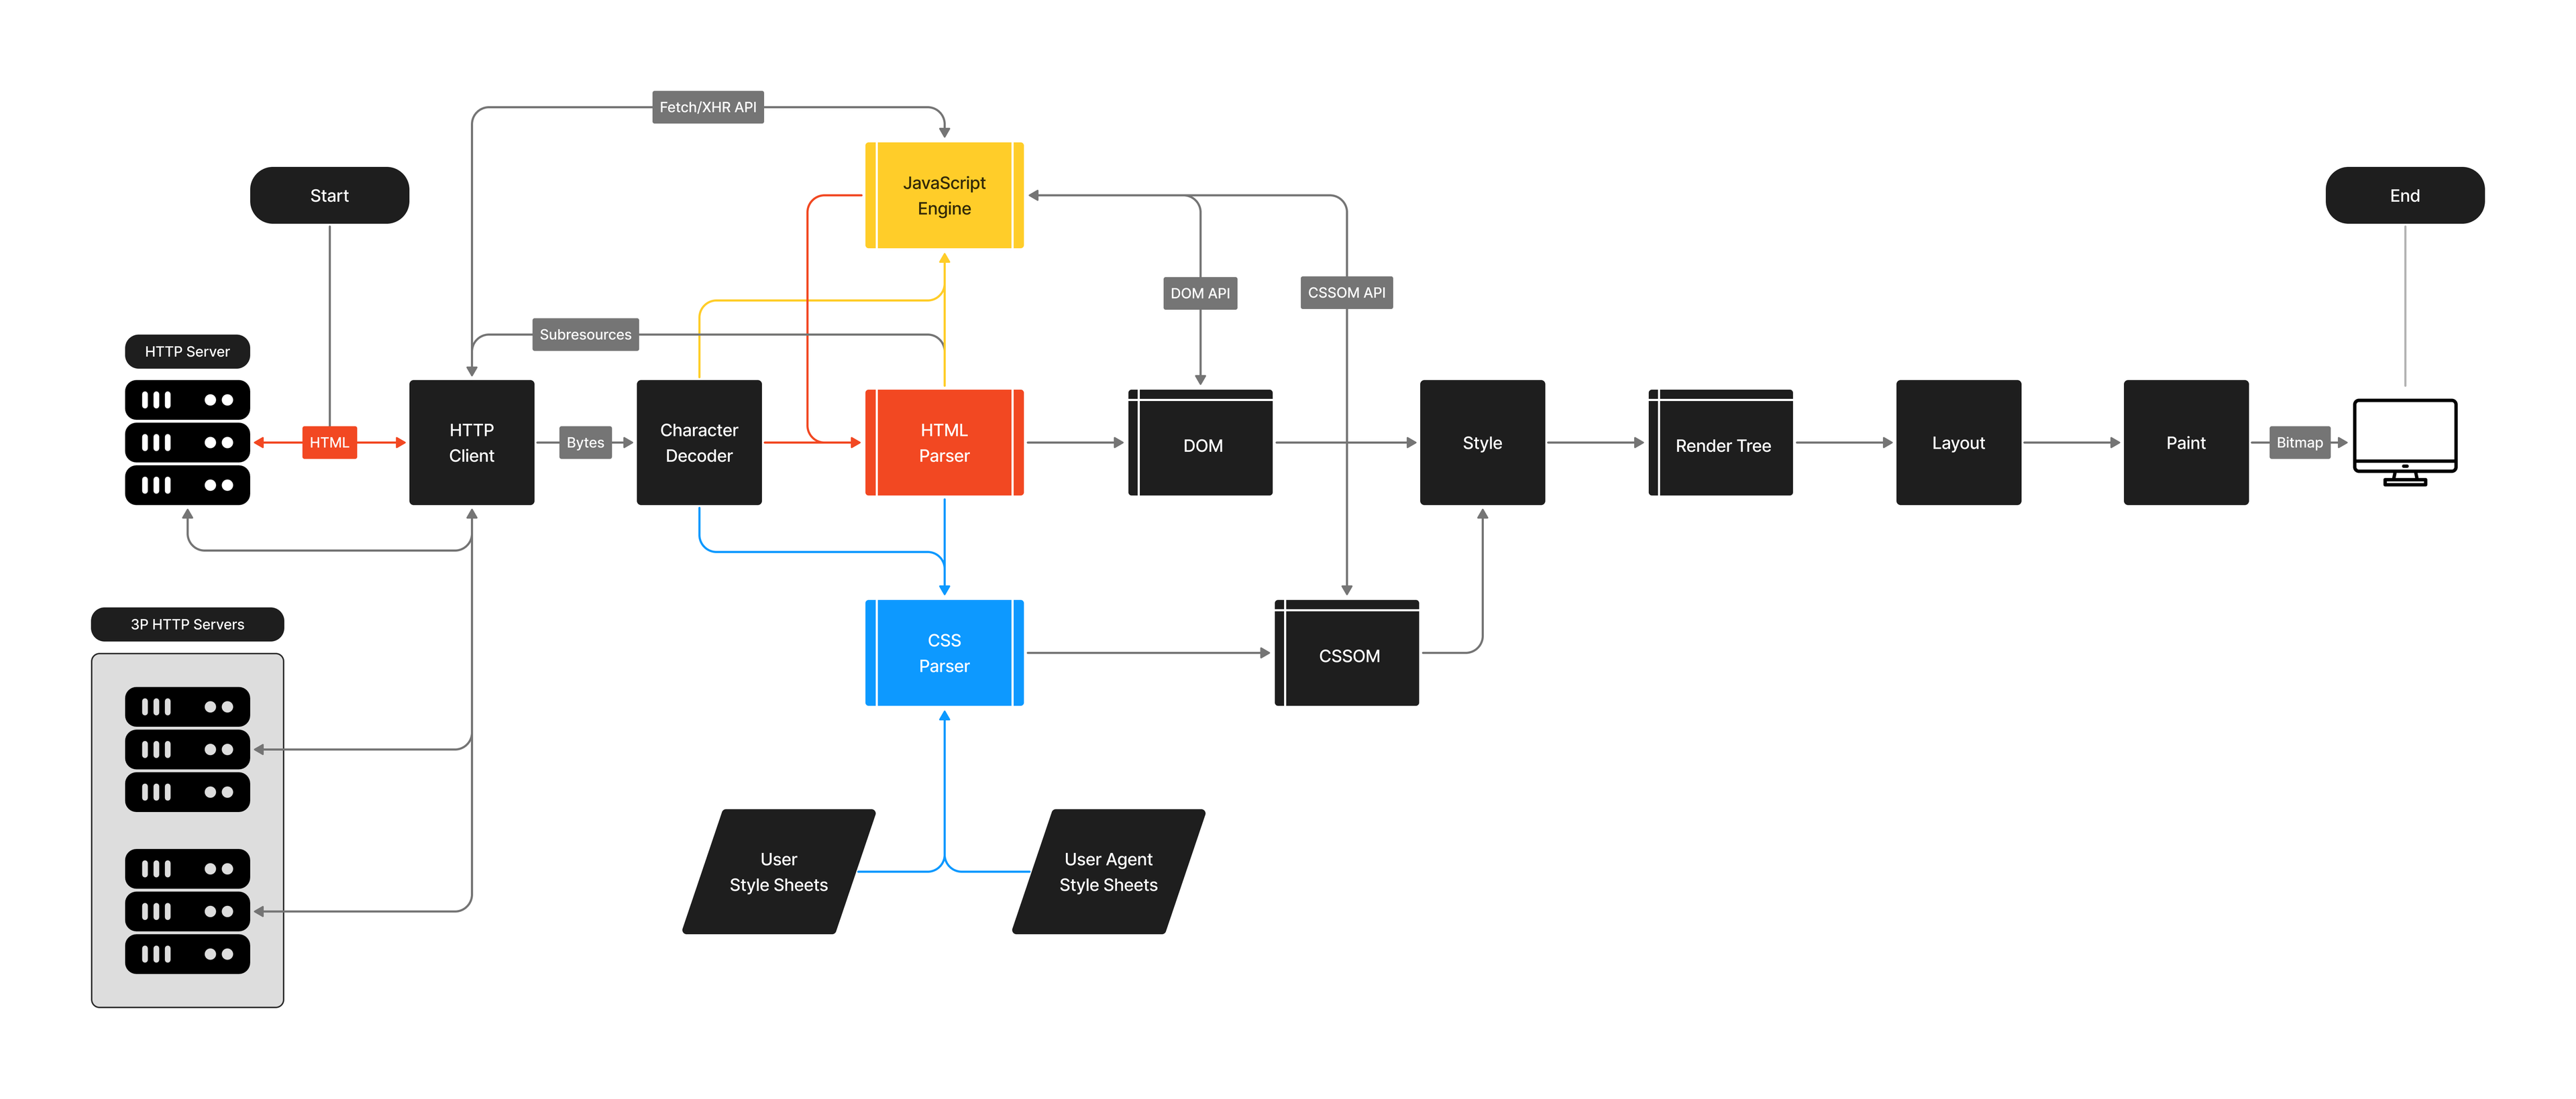
Image Credits - Johnny Gérard
For more detailed insights into Blink’s painting process, see the Blink Paint README. Meanwhile, CRP optimization is a key strategy for improving overall page performance.
In the next part of this 2 part series, we will look into what exactly qualifies plain HTML and CSS to be Turing Complete!
References
-
Deep Dive into the Browser’s Rendering Pipeline
Read here -
Browser Rendering Pipeline (Google Slides)
View Presentation -
Document on Browser Rendering (Google Docs)
Read Document -
HTML5 Parsing (W3C Specification)
Read the Specification -
Blink Renderer Layout Documentation
Read the Layout README -
Blink Renderer DOM Documentation
Read the DOM README -
Blink Style Calculation Documentation
Read Style Calculation Documentation -
Blink Style Invalidation Documentation
Read Style Invalidation Documentation -
Blink Paint Documentation
Read the Paint README -
Inside a Browser: Part 3
Read Article -
Inside a Browser: Part 4
Read Article -
Critical Rendering Path: Render Tree Construction
Read Article -
How Browsers Work (MDN)
Read Documentation -
How Browser Rendering Works Behind the Scenes
Read Article